
How to Clean Grandfather Clock Safely (Step-by-Step Guide)
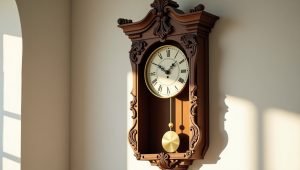
A grandfather clock is more than just a decorative piece; it’s a symbol of tradition, craftsmanship, and history. These tall, pendulum-driven clocks date back to the late 17th century and have become cherished heirlooms in many families. Whether you own an antique model passed down through generations or a handcrafted modern reproduction, regular and proper cleaning is essential to maintain its beauty and function.
Dust, humidity, and improper handling can damage both the wooden case and the internal clock movement over time. This comprehensive step-by-step guide will help you safely clean your grandfather clock using proven methods that protect its structure, preserve its finish, and support accurate timekeeping. By following each step carefully, you ensure your clock remains in excellent condition and continues to chime gracefully for years to come.
Tools and Supplies Needed to Clean a Grandfather Clock

Step 1: Prepare Before You Clean
Gather the Right Tools
Start by collecting essential supplies: microfiber cloths, cotton swabs, a soft natural brush, non-silicone wood polish, and non-ammonia glass cleaner. These gentle tools are necessary to prevent damage during cleaning.
Stop the Pendulum
Before doing anything, stop the pendulum carefully and allow it to come to rest. This prevents internal disruption and protects the timing mechanism from strain.
Clear Your Workspace
Ensure the area around your clock is clear. Remove nearby items, and make sure children or pets won’t interrupt. A safe workspace reduces the risk of bumps or accidents.
Step 2: Remove the Pendulum and Weights
Take Out the Pendulum
Hold the pendulum gently near the top and lift it off the suspension spring. Place it carefully on a padded surface. Never force or twist it.
Lower the Weights Safely
Let the weights settle naturally or use gloves to guide them down slowly. Avoid lifting them unless you are confident with their attachment method.
Store Parts Temporarily
Keep the removed parts like the pendulum and weights in a soft-lined box or on a towel. This keeps them safe and organized for reassembly later.
Step 3: Dust the Exterior Wood Cabinet
Use a Dry Microfiber Cloth
Gently wipe all wood surfaces with a dry microfiber cloth. Begin at the top and work down to avoid dragging dust across already-cleaned areas.
Brush the Carvings
For detailed moldings or carvings, use a soft brush to lift out dust from corners and edges. Avoid pressing hard or using sharp tools.
Don’t Use Wet Cleaners
Avoid applying water or commercial cleaners directly to the wood. Moisture can damage the finish and lead to long-term warping or discoloration.
Step 4: Clean the Glass Panels
Spray on the Cloth, Not the Glass
Apply non-ammonia glass cleaner to your cloth, not directly onto the glass. This prevents liquid from running into the interior components.
Clean Inside and Out
Wipe both sides of the glass if possible. Focus on smudges, fingerprints, and dust build-up using light, circular motions.
Avoid Pressure Near Edges
Use minimal pressure near glass corners or framing. These areas are often more delicate and can crack or shift with too much force.
Step 5: Wipe the Clock Face (Dial)
Use a Soft, Dry Cloth Only
The dial is one of the most delicate parts of the clock. Use a soft, dry cloth to dust lightly without rubbing or polishing.
Don’t Rub or Polish
Avoid any chemicals or moisture here. Rubbing can remove painted numbers or decorative finishes. Just a light touch is enough.
Clean Around the Hands
Use a cotton swab or fine brush to clean gently around the hands. Do not move or adjust them, as even small pressure can affect the timekeeping.
Step 6: Light Dusting Inside the Movement Area (Optional)
Use Compressed Air with Caution
A short, gentle burst of compressed air can remove surface dust. Do not shake the can, and keep a safe distance while spraying.
Very Light Brushing
Only brush areas around, not on, the movement gears. Use an artist’s brush with very soft bristles and avoid mechanical contact.
No Liquids Inside
Never introduce any oils, cleaners, or liquids into the clock’s movement unless done by a trained clock repair specialist.
Step 7: Polish the Wood (Optional)
Use Non-Silicone Wood Polish
Select a high-quality wood polish that is free from silicone. Apply it to your clothes instead of spraying directly on the surface.
Test First in a Hidden Spot
Before polishing visible areas, test a small hidden section. Wait a few minutes to ensure there is no adverse reaction with the finish.
Polish Along the Grain
Use light strokes in the direction of the wood grain. This keeps the natural look intact and prevents streaks or dull patches.
Step 8: Reassemble and Restart the Clock
Reattach the Pendulum
Secure the pendulum back onto the hook. Make sure it’s straight and not rubbing against the sides or weights.
Rehang the Weights
Return each weight to its correct chain or cable. Some clocks label them (Left, Center, Right), so ensure correct placement to avoid balance issues.
Start the Pendulum Swing
Gently move the pendulum to one side to begin its swing. Listen for a consistent, even tick to confirm it’s running correctly.
Preventive Care Tips
Maintain a Stable Environment
Avoid extreme temperature or humidity changes. Keep the clock away from windows, heating vents, or damp walls to preserve wood and metal components.
Stick to a Routine
Dust the case weekly, clean the glass monthly, and inspect the movement yearly. Scheduled care keeps your clock in top condition.
Don’t Over-Clean
Over-cleaning can wear down finishes or cause scratches. Gentle, periodic maintenance is safer than frequent aggressive cleaning.
Conclusion Gentle Hands Preserve Generations
Cleaning a grandfather clock is an act of preservation. With care, the warmth of its chime and the beauty of its craftsmanship can last lifetimes. By following each step carefully, you protect not just a clock — but the memories it holds.
Frequently Asked Questions (FAQs)
How often should I clean my grandfather clock?
Light dusting of the exterior wood and glass can be done every 1–2 weeks. A more thorough cleaning, including pendulum removal and polishing, should be done every 3–6 months. Internal movement cleaning should only be done by professionals every 5–10 years.
Can I use regular furniture polish on my grandfather clock?
No. Avoid polishes that contain silicone, wax, or heavy oils. These can build up over time and harm antique finishes. Always choose a high-quality, non-silicone wood polish and test it on a hidden area first.
Is it safe to spray glass cleaner directly on the clock?
No. Always spray the cleaner onto a cloth, never directly on the glass. This prevents liquid from running into the wooden frame or mechanical parts, where it could cause damage.
Do I need to remove the pendulum and weights before cleaning?
Yes. For safety and to avoid damaging the movement, always remove the pendulum and lower the weights before starting any serious cleaning. It also makes the process much easier and safer.
Can I clean the clock movement myself?
It’s not recommended unless you are trained in clock repair. The movement contains delicate gears and springs that are easy to damage. Use only compressed air for surface dust, and let professionals handle internal cleaning.
What should I do if my clock stops working after cleaning?
Check if the pendulum is swinging evenly and the weights are properly hung. Make sure the clock is level. If everything appears fine and it still doesn’t work, contact a qualified clock repair specialist.
What kind of cloth should I use to clean the clock face?
Use a dry, soft microfiber or cotton cloth. Avoid any moisture, polish, or scrubbing on the dial, especially if it’s painted or decorated. Gentle dusting is usually enough.
Is it okay to polish antique grandfather clocks?
Only polish if the finish is stable and undamaged. Use a gentle, tested polish and avoid overdoing it. Many antique clocks gain value from their original patina, so in some cases, polishing should be avoided altogether.
Why is it important to keep the clock in a stable environment?
Fluctuations in temperature and humidity can warp the wood or affect the metal components inside. Keep your clock away from windows, fireplaces, or vents to avoid long-term damage.
Can I move the clock while cleaning?
Avoid moving the clock unless necessary. If you must move it, always remove the pendulum and weights first, then handle it with extreme care. Sudden jolts can throw off the internal balance or break fragile parts.


Post Comment