How to Slow Down a Grandfather Clock in 6 Simple Steps
Is your beloved grandfather clock racing ahead of time? That gentle, rhythmic chime that once perfectly marked each passing hour now feels rushed and hurried. Don’t panic, you don’t need years of clockmaking experience to fix this common issue.
In this comprehensive guide, you’ll discover exactly how to slow down your grandfather clock using simple, proven techniques that restore perfect timing. Whether you’re dealing with a cherished family heirloom or a recent antique find, these step-by-step instructions will help you bring your timepiece back into harmony.

Table of Contents
Understanding Your Grandfather Clock
How Grandfather Clocks Keep Time
Your grandfather clock is a masterpiece of mechanical engineering that relies on precise pendulum motion to maintain accurate timekeeping. The pendulum’s swing controls the entire mechanism, making it the heart of your clock’s timing system.
Key Components:
- Pendulum Bob: The weighted disc that swings back and forth
- Pendulum Rod: The long shaft connecting the bob to the clock mechanism
- Regulating Nut: Small adjustment nut located under the bob
- Escapement: A mechanism that converts pendulum motion into clock movement
Why Clocks Run Fast: Common Causes
| Cause | Description | Impact on Timing |
|---|---|---|
| Pendulum Bob Position | Bob gradually moves upward, shortening pendulum length | Clock runs 2-5 minutes fast per day |
| Temperature Changes | Heat causes metal expansion, cold causes contraction | Seasonal timing variations |
| Humidity Effects | Moisture affects wooden components and pendulum rod | Irregular timing patterns |
| Leveling Issues | Moisture affects wooden components and the pendulum rod | Inconsistent pendulum swing |
| Mechanical Wear | Gears and springs show age-related changes | Gradual timing drift |
The Physics Behind Pendulum Timing
The relationship between pendulum length and timing follows a simple principle: longer pendulums swing more slowly, shorter pendulums swing faster. When you adjust the bob position, you’re changing the effective length of your pendulum.
Formula: A 1mm change in pendulum length = approximately 43 seconds per day timing change
Safety Preparation
Essential Safety Steps
Before making any adjustments to your grandfather clock, follow these critical safety measures:
Pre-Adjustment Checklist
- Stop the clock completely
- Allow pendulum to come to natural rest
- Ensure hands are clean and dry
- Remove any jewelry that might catch on components
- Have adequate lighting in work area
- Keep adjustment tools within easy reach
Why Safety Matters
Grandfather clocks contain delicate, precisely-calibrated mechanisms that can suffer permanent damage from rough handling. Additionally, these timepieces often have:
- Sharp metal edges on internal components
- Heavy weights that can fall unexpectedly
- Delicate gear systems that misalign easily
- Springs under tension that can snap back
Pro Tip: Treat your grandfather clock like a fine musical instrument—gentle, deliberate movements yield the best results.
The 6-Step Adjustment Process
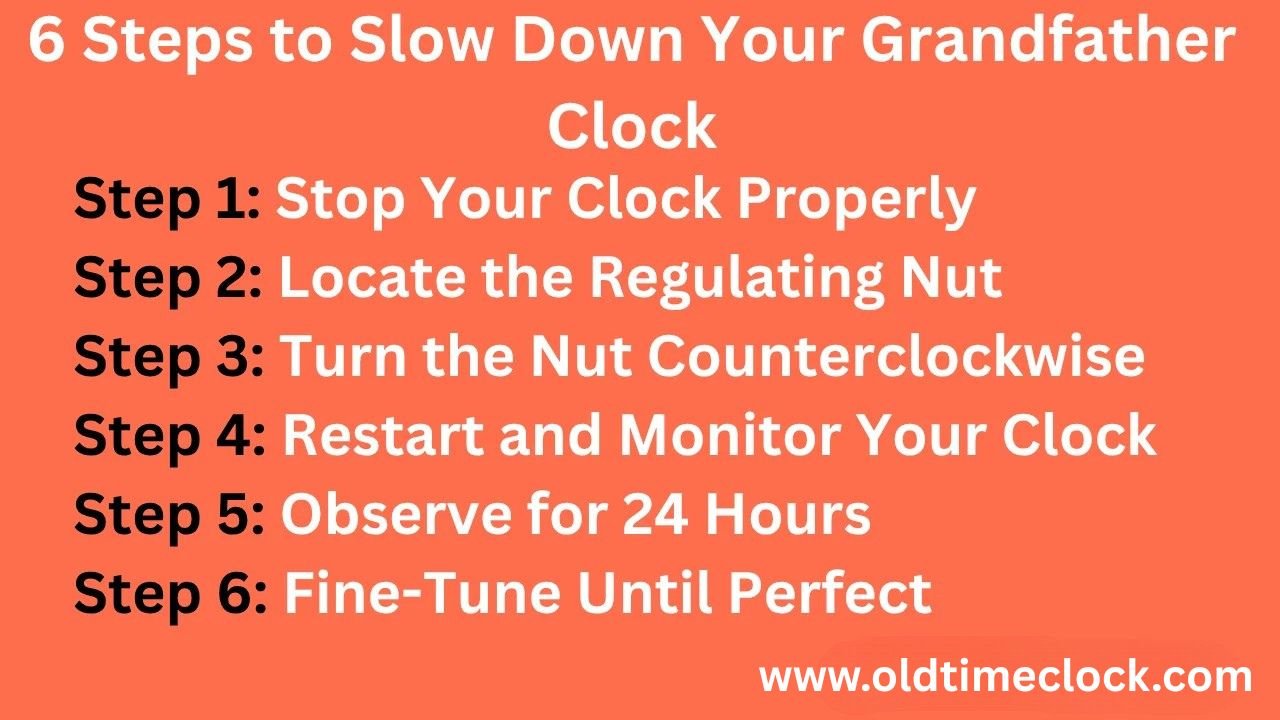
Step 1: Stop Your Clock Properly
What You’ll Do: Bring your clock to a complete, controlled stop.
Detailed Instructions:
- Open the clock case door carefully
- Locate the pendulum (usually visible behind the dial)
- Allow the pendulum to swing naturally to a stop; never force it
- Wait 2-3 minutes for all internal motion to cease
- Note the current time displayed on your clock face
Important: Never grab or abruptly stop a moving pendulum, as this can damage the escapement mechanism.
Step 2: Locate the Pendulum Adjustment Components
What You’ll Find: The regulating nut system under the pendulum bob.
Identifying the Regulating Nut
The regulating nut is typically:
- Located directly beneath the pendulum bob
- Made of brass or similar metal
- Approximately 1-2 inches in diameter
- Threaded to allow up/down bob movement
- Hand-turnable (though sometimes requiring tools)
Required Tools
| Tool | Purpose | Alternative |
|---|---|---|
| Small Adjustable Wrench | Turning tight regulating nuts | Needle-nose pliers with cloth wrapping |
| Flashlight or Phone Light | Illuminating adjustment area | Desk lamp positioned nearby |
| Soft Cloth | Protecting metal surfaces | Clean cotton rag |
| Small Notebook | Recording adjustments and timing | Phone notes app |
Step 3: Make Your First Adjustment
Goal: Lower the pendulum bob to slow down the clock.
The Quarter-Turn Method
Direction: Turn the regulating nut counterclockwise (left) to lower the bob.
Adjustment Guidelines:
- Start with exactly 1/4 turn (90 degrees)
- Use steady, controlled pressure
- Stop if you feel excessive resistance
- Mark your starting position mentally
Expected Results Table
| Adjustment Amount | Expected Daily Change | Best Used When |
|---|---|---|
| 1/4 Turn | 30-60 seconds slower | Clock runs 1-2 minutes fast |
| 1/8 Turn | 15-30 seconds slower | Fine-tuning minor speed issues |
| 1/2 Turn | 60-120 seconds slower | Significant speed problems |
Step 4: Restart and Begin Testing
Process: Carefully restart your clock and begin timing observation.
Proper Restart Technique
- Give the pendulum a gentle push to start swinging
- Ensure swing amplitude is consistent (about 3-4 inches each direction)
- Listen for an even “tick-tock” rhythm
- Close case door gently
- Record exact restart time
Setting Up Your Timing Test
Reference Time Sources:
- Atomic clock apps on your phone
- Radio-controlled digital clocks
- Official time websites (time.gov)
- Cable TV time displays
Timing Log Format:
Adjustment Date: [Date]
Restart Time: [Exact time when restarted]
Adjustment Made: [1/4 turn counterclockwise]
24-Hour Check Time: [Time shown after 24 hours]
Reference Time: [Actual time after 24 hours]
Difference: [Fast/slow by X minutes]
Step 5: 24-Hour Observation Period
Critical Phase: Allow a full day for accurate timing assessment.
What to Monitor
During your 24-hour observation period, pay attention to:
- Timing Consistency: Does the clock maintain a steady rhythm?
- Environmental Factors: Temperature and humidity changes
- Pendulum Motion: Continues swinging smoothly throughout the day
- Any Unusual Sounds: Grinding, catching, or irregular ticking
Recording Your Results
Timing Calculation Example:
- Restart time: 12:00:00 PM (exactly)
- After 24 hours, clock shows: 11:58:30 AM
- Actual time: 12:00:00 PM
- Result: Clock is now 1 minute 30 seconds slow per day
Step 6: Fine-Tuning Adjustments
Objective: Achieve timing accuracy within ±30 seconds per day.
Adjustment Decision Tree
Is your clock still fast?
YES → Make another 1/8 turn counterclockwise
Wait another 24 hours and recheck
NO→ Is it now too slow?
YES → Make 1/8 turn clockwise
Wait 24 hours and recheck
NO → Perfect! Your clock is properly adjusted
Advanced Fine-Tuning
For precision timing within ±15 seconds per day:
Micro-Adjustments:
- Use 1/16 turns for final tweaking
- Allow 48-hour observation periods
- Track timing over a full week
- Account for seasonal temperature variations
Troubleshooting Common Issues
Problem: Clock Won’t Stay Running After Adjustment
Possible Causes & Solutions:
| Symptom | Likely Cause | Solution |
|---|---|---|
| Pendulum stops within hours | Insufficient winding | Wind clock fully, ensure weights are properly positioned |
| Irregular ticking sound | Escapement misalignment | Gently level clock case, check for obstructions |
| Pendulum swings unevenly | Clock not level | Use spirit level, adjust leg levelers or add shims |
Problem: Adjustment Nut Won’t Turn
Step-by-Step Solution:
- Apply light penetrating oil (3-in-1 oil works well)
- Wait 15 minutes for the oil to penetrate
- Use cloth-wrapped pliers for a better grip
- Turn very gradually, never force
- If still stuck, consult a professional technician
Problem: Clock Runs Irregularly Despite Adjustments
This may indicate internal mechanical issues requiring professional attention:
- Worn gear teeth
- Damaged escapement components
- Pendulum suspension problems
- Weight system malfunctions
Essential Maintenance Guidelines
Monthly Maintenance Checklist
Visual Inspection
- Check pendulum swing amplitude (should be consistent)
- Verify clock case is level and stable
- Look for dust accumulation on visible components
- Ensure weights hang freely without obstruction
- Confirm all case doors close properly
Basic Cleaning
- Dust clock case exterior with soft cloth
- Clean glass panels with appropriate cleaner
- Remove cobwebs from weight chains or cables
- Wipe pendulum bob with slightly damp cloth
- Check floor area for dust that might affect leveling
Seasonal Maintenance
Spring/Summer Preparation
- Monitor for humidity-related timing changes
- Check for wood expansion affecting pendulum clearance
- Ensure adequate ventilation around clock
- Consider slight timing adjustments for temperature changes
Fall/Winter Preparation
- Account for heating system effects on timing
- Check for drafts that might affect pendulum swing
- Monitor for dry air effects on wooden components
- Adjust expectations for minor seasonal timing variations
Professional Service Schedule
| Service Type | Frequency | What’s Included |
|---|---|---|
| Basic Cleaning | Every 2 years | Movement cleaning, basic lubrication |
| Complete Service | Every 5-7 years | Full disassembly, part replacement, calibration |
| Restoration | As needed | Case refinishing, dial restoration, major repairs |
When to Call a Professional Clock Technician
Clear Indicators You Need Expert Help
Mechanical Issues
- Gears slip or bind during operation
- Unusual grinding or scraping sounds
- Pendulum stops frequently despite proper winding
- Hands move irregularly or stick
- Chime mechanism malfunctions
Timing Problems Beyond DIY Fixes
- Clock remains inaccurate despite multiple adjustments
- Timing varies dramatically day to day
- Pendulum swing becomes increasingly erratic
- Regulating nut stripped or damaged during adjustment
Value Considerations
- Antique clocks (pre-1900): Always consult professionals
- High-value timepieces ($5,000+): Professional maintenance essential
- Family heirlooms: Preserve value with expert care
- Rare or unusual movements: Specialized knowledge required
Finding Qualified Clock Technicians
What to Look For
- Certification: Look for American Watchmakers-Clockmakers Institute (AWCI) credentials
- Experience: Minimum 5+ years specifically with grandfather clocks
- References: Customer testimonials and local reputation
- Insurance: Proper coverage for handling valuable timepieces
- Warranty: Guarantees on work performed
Questions to Ask Potential Technicians
- How many grandfather clocks do you service annually?
- Can you provide references from recent customers?
- What’s included in your standard service?
- Do you offer pickup/delivery for large clocks?
- What warranty do you provide on repairs?
Advanced Tips for Perfect Timekeeping
Environmental Optimization
Ideal Clock Placement
- Location: Interior wall, away from exterior doors/windows
- Surface: Solid, level floor (avoid carpet if possible)
- Temperature: Consistent 65-75°F (18-24°C)
- Humidity: 30-50% relative humidity year-round
- Vibration: Away from heavy foot traffic or appliances
Seasonal Timing Expectations
Temperature Effects on Timing:
- Summer: Metal expansion may cause the clock to run slightly slow
- Winter: Metal contraction may cause the clock to run slightly fast
- Acceptable variance: ±2 minutes per day with seasonal changes
- Adjustment recommendation: Make minor adjustments seasonally if needed
Long-Term Care Strategy
Record Keeping
Maintain a simple log tracking:
- Monthly timing checks
- Seasonal adjustments made
- Professional service dates
- Any unusual observations or problems
Preventive Measures
- Keep spare key for winding
- Document your clock’s specific adjustment patterns
- Take photos of proper weight positions
- Maintain contact information for preferred technician
Conclusion: Enjoying Your Perfectly-Timed Grandfather Clock
Successfully adjusting your grandfather clock’s timing is both a practical skill and a rewarding experience. By following these detailed steps and maintaining regular care, your timepiece will provide accurate, reliable service for generations to come.
Remember that patience is your greatest tool—small, thoughtful adjustments yield far better results than hasty corrections. Your grandfather clock is not just a timekeeper; it’s a mechanical work of art that deserves careful, respectful attention.
Key Takeaways
- Start small: Always begin with quarter-turn adjustments
- Be patient: Allow 24-48 hours between timing assessments
- Stay consistent: Keep detailed records of all adjustments
- Know limits: Recognize when professional help is needed
- Enjoy the process: Take pride in maintaining this mechanical marvel
With proper care and occasional fine-tuning, your grandfather clock will continue marking time with the same precision and dignity it was designed to provide, creating a lasting legacy of craftsmanship in your home.
Final Thoughts: Mastering Your Grandfather Clock’s Timing
Adjusting your grandfather clock’s timing is more than just a mechanical task; it’s about preserving a piece of history and ensuring it continues to serve your family for generations. The gentle, rhythmic tick of a properly adjusted grandfather clock brings a sense of order and tranquility to any home.
Your Success Checklist
By following this guide, you’ve learned to:
- Understand the mechanical principles behind pendulum timing
- Safely adjust your clock using the quarter-turn method
- Monitor and fine-tune timing accuracy over multiple days
- Maintain your timepiece for long-term reliability
- Recognize when professional help is needed
The Reward of Precision
There’s something deeply satisfying about hearing your grandfather clock chime exactly on the hour, knowing that you’ve personally fine-tuned this mechanical marvel. Each tick represents not just the passage of time, but your connection to centuries of clockmaking tradition.
Remember, patience is your greatest ally in this process. Small adjustments and careful observation will always yield better results than rushed corrections. Your grandfather clock is a testament to human craftsmanship—treat it with the respect and care it deserves.
Frequently Asked Questions (FAQs)
General Adjustment Questions
How often should I adjust my grandfather clock’s timing?
Most well-maintained grandfather clocks need timing adjustments only 2-3 times per year, typically with seasonal temperature changes. If your clock requires frequent adjustments, it may need professional servicing.
Can I damage my clock by adjusting the pendulum?
A: When done correctly using the quarter-turn method, pendulum adjustments are very safe. The risk comes from over-adjusting or using excessive force. Always make small changes and never force stuck components.
What’s the acceptable timing accuracy for a grandfather clock?
A properly adjusted grandfather clock should maintain accuracy within ±1-2 minutes per week. Daily variations of ±30 seconds are considered excellent for a mechanical timepiece.
Why does my clock’s timing change with the weather?
Temperature and humidity affect metal and wood components differently. Heat causes expansion (the clock runs slower), while cold causes contraction (the clock runs faster). Humidity affects wooden pendulum rods and case components.
How do I know if my regulating nut is stripped or damaged?
Signs include: the nut turns freely without moving the bob, visible thread damage, or extreme difficulty turning. If suspected, stop adjustments and consult a professional immediately.
Can I adjust the timing while the clock is running?
Never adjust the pendulum while the clock is running. Always stop the clock completely, make your adjustment, then restart. This prevents damage to the escapement mechanism.
Troubleshooting Questions
My clock stops running after I make timing adjustments. What’s wrong?
Common causes include: insufficient winding, clock not properly leveled, or pendulum hitting something during its swing. Check these basics before assuming mechanical problems.
The pendulum swings unevenly after adjustment. How do I fix this?
Uneven swinging usually indicates the clock isn’t level. Use a spirit level to check the case, and adjust the leveling screws or add shims under the base as needed.
I’ve made several adjustments, but my clock is still inaccurate. What should I do?
If multiple adjustments don’t solve timing issues, you likely have internal mechanical problems. This is when you should consult a certified clock technician rather than continuing DIY attempts.
Maintenance Questions
How do I know when my grandfather clock needs professional servicing?
Schedule professional service every 5-7 years, or sooner if you notice: irregular timing despite adjustments, unusual sounds, pendulum stopping frequently, or visible wear on components.
What’s the difference between cleaning and full servicing?
Basic cleaning (every 2 years) involves surface cleaning and light lubrication. Full servicing (every 5-7 years) includes complete disassembly, part cleaning/replacement, and recalibration.
Can I oil my grandfather clock myself?
While you can apply light oil to the pendulum suspension, internal movement oiling requires expertise. Using wrong oils or over-oiling can cause serious damage. Leave internal lubrication to professionals.
Safety & Care Questions
Is it safe to move my grandfather clock after making timing adjustments?
Yes, but secure the pendulum and weights first. Remove the pendulum completely for long-distance moves. Short moves within the same room usually require only stopping the pendulum.
My grandfather clock is an antique. Are these adjustment methods still safe?
The basic principles apply, but antique clocks may have worn or fragile components. Use extra caution, make smaller adjustments, and consider professional consultation for valuable antiques.
What should I do if I accidentally over-adjust my clock?
Don’t panic. Simply turn the regulating nut in the opposite direction to reverse your adjustment. If you’re unsure how much you turned it, start with small corrections and observe the timing over 24-48 hours.
Environmental Questions
Where’s the best place to position my grandfather clock for stable timing?
Choose an interior wall away from heating/cooling vents, direct sunlight, and exterior doors. The floor should be solid and level. Avoid high-traffic areas where vibrations might affect the pendulum.
How does air conditioning/heating affect my clock’s timing?
HVAC systems create temperature variations that can affect timing. Gradual, consistent temperatures are best. Avoid placing clocks directly in the path of air vents or near heat sources.
Should I adjust my clock’s timing seasonally?
Minor seasonal adjustments are normal. Many clock owners make small timing corrections in spring and fall to account for temperature changes. Keep a log to track your clock’s seasonal patterns.
Professional Service Questions
How do I find a qualified grandfather clock technician?
Look for American Watchmakers-Clockmakers Institute (AWCI) certification, ask for references, and verify they have specific experience with grandfather clocks. Local antique dealers often know reputable technicians.
What should professional grandfather clock service cost?
Basic cleaning: $150-300. Complete service: $400-800. Restoration work: $800-2000+. Prices vary by region and clock complexity. Always get written estimates before work begins.
How long should a professional clock service take?
Basic cleaning: 1-2 weeks. Complete service: 3-6 weeks. Complex repairs or restorations: 2-6 months. Reputable technicians provide realistic timeframes and update you on progress.


Post Comment